Sie möchten also den Support zum Antworten per E-Mail für Ihr Discourse-Forum einrichten.
Die Antwort per E-Mail ist auf allen bei discourse.org gehosteten Websites standardmäßig vorkonfiguriert und aktiviert. Die folgende Anleitung gilt nur für selbst gehostete Instanzen.
Gute Nachrichten! Im Gegensatz zum ausgehenden E-Mail-Verkehr, der für typische Verbraucher-Maildienste wie GMail, Outlook, Yahoo Mail usw. völlig ungeeignet ist, ist der eingehende Antwort-per-E-Mail-Verkehr tendenziell extrem gering. Sofern Sie kein wirklich massives Forum mit unzähligen Leuten haben, die auf Benachrichtigungs-E-Mails antworten, sind Sie wahrscheinlich sicher, wenn Sie beispielsweise Gmail verwenden.
Alternativ, wenn Sie sich nicht wohl dabei fühlen, Gmail hierfür zu verwenden, können Sie Ihren eigenen eingehenden E-Mail-Dienst mit Configure direct-delivery incoming email for self-hosted sites with Mail-Receiver einrichten.
Hier erfahren Sie, wie Sie dies anhand von GMail als Beispiel einrichten.
-
Erstellen Sie ein neues GMail-Konto. Wenn Sie kein komplett neues E-Mail-Konto einrichten, werden alte E-Mails via POP3 synchronisiert, was zu unvorhergesehenen Problemen führt und Bounce-Benachrichtigungs-E-Mails sendet!
-
Geben Sie dem neuen Konto einen Benutzernamen wie
discourse-replies@example.comoder in meinem Fallreplies@example.com(wenn Sie ein normales GMail-Konto verwenden, ersetzen Sie hier@example.comdurch@gmail.com). Vergeben Sie ein starkes Passwort. -
Melden Sie sich über http://mail.google.com bei diesem Konto an. Akzeptieren Sie die Nutzungsbedingungen, geben Sie das CAPTCHA ein, laden Sie die Standard-Weboberfläche. Senden Sie vielleicht eine Test-E-Mail und empfangen Sie eine Test-E-Mail. Machen Sie eine kleine Probe.
-
POP3s-Zugriff ist standardmäßig in Gmail deaktiviert, schalten Sie ihn also über Einstellungen, Weiterleitung und POP/IMAP ein:
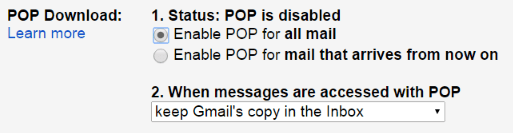
Alle eingehenden E-Mails werden standardmäßig aufbewahrt – Sie können dies jedoch nach Bedarf anpassen.
-
Besuchen Sie die Discourse-Einstellungen und überprüfen Sie die Registerkarte E-Mail.
-
Ändern Sie die folgenden Einstellungen:
reply_by_email_addressgeben Siereplies+%{reply_key}@example.comeinpop3_polling_usernamegeben Siereplies@example.comeinpop3_polling_passwordgeben Sie das Passwort dieses E-Mail-Kontos einpop3_polling_hostaufpop.gmail.comsetzenpop3_polling_enabledauftruesetzenreply_by_email_enabledauftruesetzen

Es findet eine gewisse Abfrage (Polling) für dieses Konto statt, aber wir haben sie auf ein niedriges, sicheres Volumen eingestellt – Sie können das Abfrageintervall über die Einstellung pop3_polling_period_mins konfigurieren.
Wir gehen davon aus, dass Ihr E-Mail-Dienst Plus-Adressierung, auch bekannt als Adress-Tags unterstützt, prüfen Sie dies also, bevor Sie beginnen. GMail tut dies offensichtlich.
Wenn alles funktioniert, sollte die Fußzeile aller Benachrichtigungs-E-Mails Ihnen nun mitteilen, dass Sie antworten können, indem Sie entweder die Website besuchen oder per E-Mail antworten:
Um zu antworten, antworten Sie auf diese E-Mail oder besuchen Sie {topic URL} in Ihrem Browser.
Wenn Dinge nicht funktionieren:
-
Überprüfen Sie den Pfad
/logsIhres Discourse in Ihrem Webbrowser und suchen Sie nach Fehlermeldungen, die sich auf E-Mail beziehen. -
Melden Sie sich über Ihren Webbrowser bei Ihrem Mail-Konto an und prüfen Sie auf Fehler oder Benachrichtigungen.
Weiterleiten von E-Mails an zusätzliche Adressen
Angenommen, Sie fragen E-Mails vom Konto “replies@your.domain” ab und möchten eingehende E-Mails für “help@your.domain” und “dev@your.domain” einrichten.
Sie müssen alle E-Mails, die an “help@your.domain” und “dev@your.domain” gesendet werden, an “replies@your.domain” weiterleiten. Wenn Sie GMail verwenden, gibt es dort eine großartige Anleitung zum automatischen Weiterleiten eingehender E-Mails an ein anderes Konto.
Anschließend fragt Discourse periodisch E-Mails vom Konto “reply@discourse.org” ab und stellt die E-Mails der entsprechenden category, group, topic oder message zu.
Mögliche Probleme
-
Wir hatten Schwierigkeiten bei der Anmeldung für ein GMail-Konto aus einem anderen Land als dem Standort Ihres Servers. Wenn Sie beispielsweise das Gmail-Konto in Großbritannien erstellen, der Server sich aber in den USA befindet.
-
Wenn Sie ein GMail-Konto (z. B. @gmail.com) oder eine Google Workspace-Mailbox (z. B. eine Google-Mailbox @yourdomain.com) verwenden, müssen Sie ein App-Passwort für Ihr Konto erstellen, das anstelle Ihres Kontopassworts in Schritt 6 verwendet wird.
Siehe auch: Troubleshoot reply by email
ℹ Seit dem 30. Mai 2022 wird die Google-Option **Zugriff für weniger sichere Apps** nicht mehr unterstützt. Sie müssen daher App-Passwörter verwenden und die Zwei-Faktor-Authentifizierung aktivieren, um dies zu tun.