Esta guía explica cómo cambiar el nombre de dominio de su sitio de Discourse e incluye información sobre cómo configurar los cambios de DNS, editar archivos de configuración, actualizar la configuración del sitio y corregir los inicios de sesión sociales y el contenido de las publicaciones para que reflejen su nuevo nombre de dominio.
Esta guía es para instancias de Discourse autohospedadas que se instalaron utilizando nuestra guía de instalación en GitHub. Si usted está hospedado por Discourse, por favor consulte Configure your domain name for hosted Discourse para instrucciones específicas.
Es posible que eventualmente desee cambiar el nombre de dominio de su instancia de Discourse, de por ejemplo
=BEFORE= → =AFTER=
Empecemos.
Configurar el TTL de DNS a un valor bajo con antelación
Primero, cambie la configuración de Tiempo de Vida (TTL) de su DNS a un valor bajo como 60 minutos. Esto debe hacerse días antes del cambio de dominio real para asegurar que el cambio se propague rápidamente por internet.
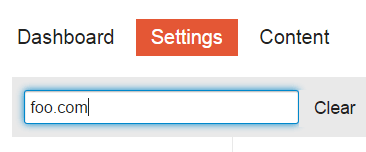
Eliminar el nombre de dominio antiguo de cualquier configuración del sitio
Visite /admin/site_settings en su interfaz de administración de Discourse y busque cualquier configuración que contenga el nombre de dominio antiguo. Actualice estas configuraciones al nuevo nombre de dominio.
Cambiar los Registros DNS
Actualice su configuración de DNS para deshabilitar el dominio antiguo y apuntar el nuevo dominio a la dirección IP de su servidor Discourse.
Editar el nombre del sitio en app.yml
Puede editar el archivo app.yml manualmente para introducir la nueva información del dominio.
A continuación se muestra cómo editarlo manualmente:
cd /var/discourse
nano containers/app.yml
Localice la siguiente línea y reemplácela:
DISCOURSE_HOSTNAME: 'your.newdomain.com'
Si utiliza una Red de Distribución de Contenidos (CDN), desactívela temporalmente comentando la línea respectiva en app.yml. Reconstruya su sitio de Discourse con:
./launcher rebuild app
Alternativamente, puede ejecutar
./discourse-setupnuevamente e introducir la nueva información del dominio en lugar de editarapp.yml.
Verifique que su sitio esté operativo bajo el nuevo dominio.
Arreglar los inicios de sesión sociales
Dependiendo de cómo haya iniciado sesión, es posible que deba hacer esto primero o no podrá iniciar sesión una vez que se cambie el nombre.
Si utiliza inicios de sesión sociales, actualice las credenciales en las plataformas (Twitter, Facebook, Google, GitHub) para reflejar el nuevo dominio. Busque guías en la categoría de cómo hacer de Discourse.
Remapear nombres de dominio en las publicaciones
Todas las publicaciones existentes seguirán haciendo referencia al dominio antiguo.
Necesitará cambiar las referencias al dominio antiguo en sus publicaciones por el nuevo dominio:
./launcher enter app
luego
discourse remap =BEFORE= =AFTER=
Finalice con:
rake posts:rebake
Esto asegura que el nombre de dominio se remapee en las publicaciones existentes y que el contenido se regenere según sea necesario.
¿Tiene curiosidad sobre cómo creamos ese formulario?
